Firebase with Windows
無料で認証やらデータベースやらが揃ったサイトが作れる。 デザインこそ一から作らないとだが、そこさえどうにかすれば認証だのリアルタイムデータ表示だの、そういう楽しそうなサイトを作る受け皿を、目の前に準備してくれるというね。
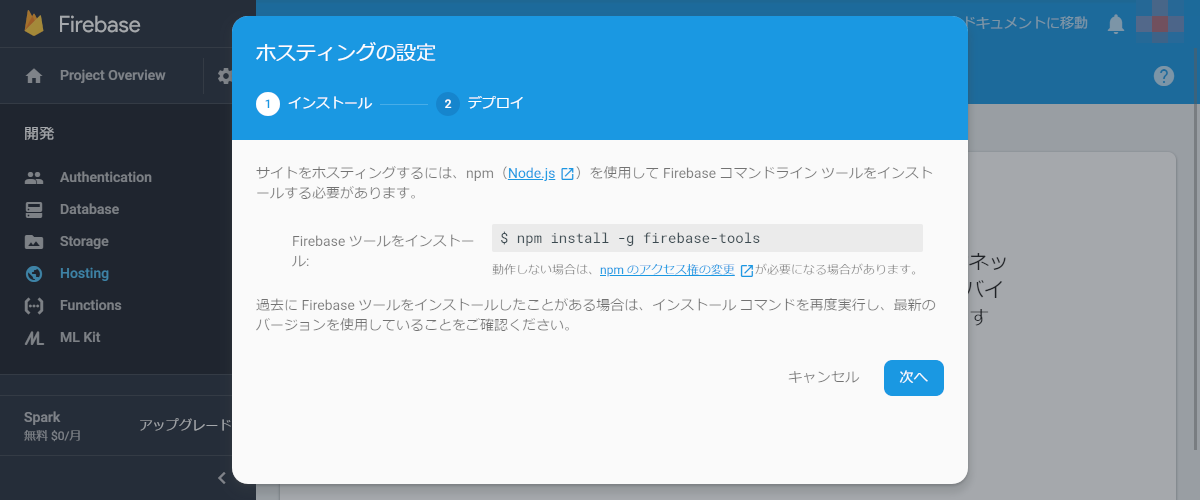
インストール
- Node.jsをここからダウンロードして、インストール
-
(WindowsメニューのNode.jsではなく)
Node.js command promptがあるので、開く - インストールされているか確認
$ node --version $ npm --version - インストール
$ npm install -g firebase-tools
ただし、以降は個人的な趣味によりGit Bashで作業。
プロジェクト
作成とか
既にインストール済みですね
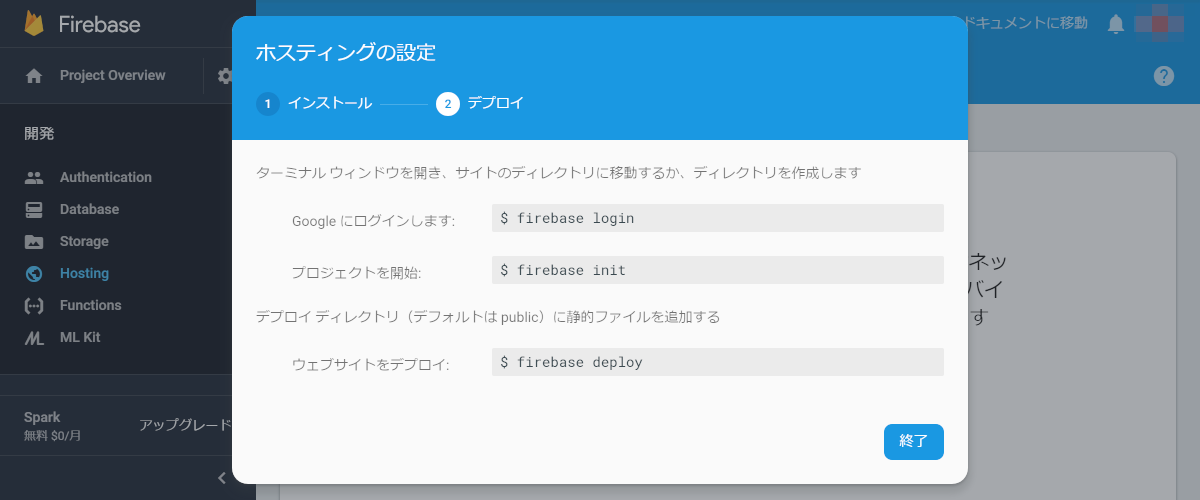
ログイン
ホスティング設定
怒られた
$ firebase login

Error: Cannot run login in non-interactive mode. See login:ci to generate a token for use in non-interactive environments.
ヘルプを見てみる
$ firebase --help
Usage: firebase [options] [command]

Options:
  -V, --version                              output the version number
  -P, --project <alias_or_project_id>        the Firebase project to use for this command
  -j, --json                                 output JSON instead of text, also triggers non-interactive mode
  --token <token>                            supply an auth token for this command
  --non-interactive                          error out of the command instead of waiting for prompts
  --interactive                              force interactive shell treatment even when not detected
  --debug                                    print verbose debug output and keep a debug log file
  -h, --help                                 output usage information

Commands:
(略)
  login [options]                            log the CLI into Firebase
  login:ci [options]                         generate an access token for use in non-interactive environments
(略)
login:ciのヘルプも見てみる
$ firebase login:ci --help
Usage: login:ci [options]

generate an access token for use in non-interactive environments

Options:
  --no-localhost  copy and paste a code instead of starting a local server for authentication
  -h, --help      output usage information
こういうことか
$ firebase --interactive login:ci

Visit this URL on any device to log in:
https://accounts.google.com/o/oauth2/auth?client_id=(略).apps.googleusercontent.com&scope=email%20openid%20https%3A%2F%2Fwww.googleapis.com%2Fauth%2Fcloudplatformprojects.readonly%20https%3A%2F%2Fwww.googleapis.com%2Fauth%2Ffirebase%20https%3A%2F%2Fwww.googleapis.com%2Fauth%2Fcloud-platform&response_type=code&state=5(略)&redirect_uri=http%3A%2F%2Flocalhost%3A9005

Waiting for authentication...
Googleさんが権限を要求してきた
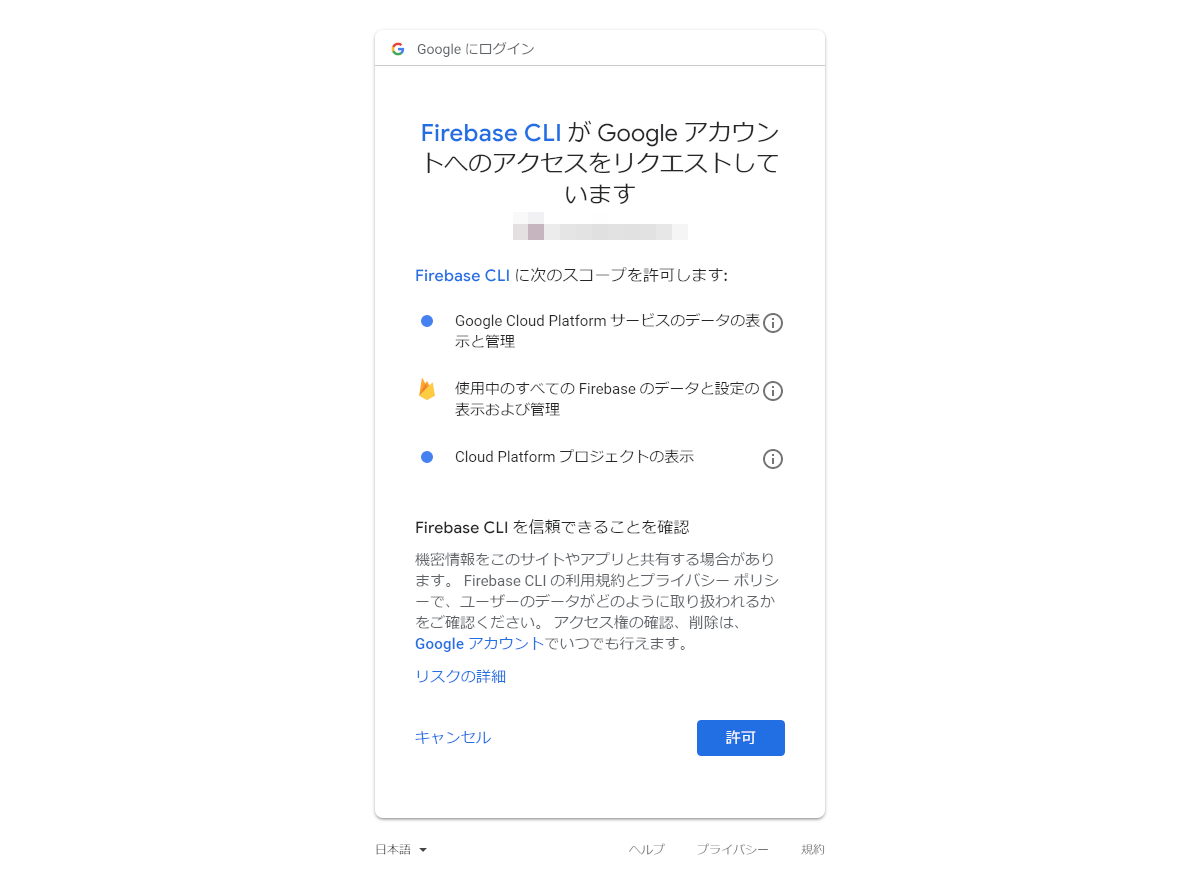
許可した
+  Success! Use this token to login on a CI server:
(略)
Example: firebase deploy --token "$FIREBASE_TOKEN"
そしてログイン
$ firebase login --interactive
確認
$ firebase projects:list
┌──────────────────────┬────────────────────┬──────────────────────┐
│ Project Display Name │ Project ID         │ Resource Location ID │
├──────────────────────┼────────────────────┼──────────────────────┤
│ projectname          │ project-id         │ [Not specified]      │
└──────────────────────┴────────────────────┴──────────────────────┘
開始
$ firebase init

     ######## #### ########  ######## ########     ###     ######  ########
     ##        ##  ##     ## ##       ##     ##  ##   ##  ##       ##
     ######    ##  ########  ######   ########  #########  ######  ######
     ##        ##  ##    ##  ##       ##     ## ##     ##       ## ##
     ##       #### ##     ## ######## ########  ##     ##  ######  ########

You're about to initialize a Firebase project in this directory:

  (今いるディレクトリ)

? Are you ready to proceed? (Y/n)
作業を進めてみる
? Are you ready to proceed? (Y/n) y
? Are you ready to proceed? Yes
? Which Firebase CLI features do you want to setup for this folder? Press Space to select features, then Enter to confirm your choices. (Press <space> to select)
>( ) Database: Deploy Firebase Realtime Database Rules
 ( ) Firestore: Deploy rules and create indexes for Firestore
 ( ) Functions: Configure and deploy Cloud Functions
 ( ) Hosting: Configure and deploy Firebase Hosting sites
 ( ) Storage: Deploy Cloud Storage security rules
Hosting: Configure deploy Firebase Hosting sitesを選択
…したいのだが、Git Bashだと矢印キーで選択できない
Git Bashでfirebase loginするを参照し、4を選択
=== Project SetupHosting sites

First, let's associate this project directory with a Firebase project.
You can create multiple project aliases by running firebase use --add, but for now we'll just set up a default project.

? Select a default Firebase project for this directory: (Use arrow keys)
> [don't setup a default project]
  (ブロジェクトがずらずらと)
  [create a new project]
さっきの要領で数字で選択 あとはディレクトリ名指定やトップページを上書きするかとか
? Select a default Firebase project for this directory: (Use arrow keys)
? Select a default Firebase project for this directory: プロジェクトID (プロジェクト名)
i  Using project プロジェクトID (プロジェクト名)

=== Hosting Setup

Your public directory is the folder (relative to your project directory) that will contain Hosting assets to be uploaded with firebase deploy. If you have a build process for your assets, use your build's output directory.

? What do you want to use as your public directory? (public) ディレクトリ名指定
? What do you want to use as your public directory?  ディレクトリ名
? Configure as a single-page app (rewrite all urls to /index.html)? (y/N) y
? Configure as a single-page app (rewrite all urls to /index.html)? Yes
+  Wrote ディレクトリ名/index.html

i  Writing configuration info to firebase.json...
i  Writing project information to .firebaserc...

+  Firebase initialization complete!
いろいろ作成されてる
firebase
 ├─ ディレクトリ名
 |   ├─ 404.html
 |   └─ index.html
 ├─ .firebaserc
 └─ firebase.json
管理
切り替える
$ firebase use プロジェクトID
Now using project プロジェクトID
プロジェクトIDに対して名前をつける(プロジェクト名ではない)
$ firebase use --add プロジェクトID --alias 付けたい名前
Created alias 付けたい名前 for プロジェクトID.
Now using alias 元の名前 (プロジェクトID)
すると、プロジェクトIDではなく付けた名前で切り替えができる
$ firebase use 名前
Now using alias 名前 (プロジェクトID)
名前を全部消す
$ firebase use --clear
Cleared active project.

Project aliases for ディレクトリ:

  default (現在のプロジェクトID)

Run firebase use --add to define a new project alias.
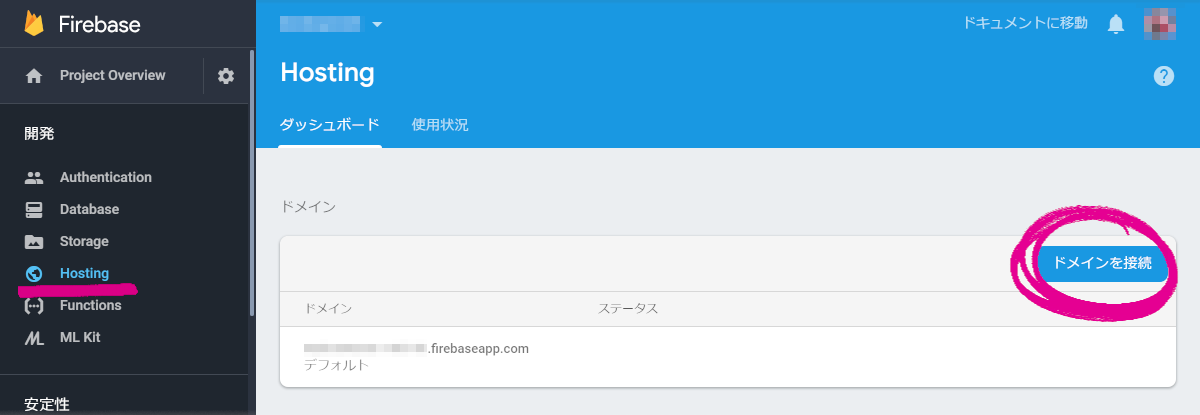
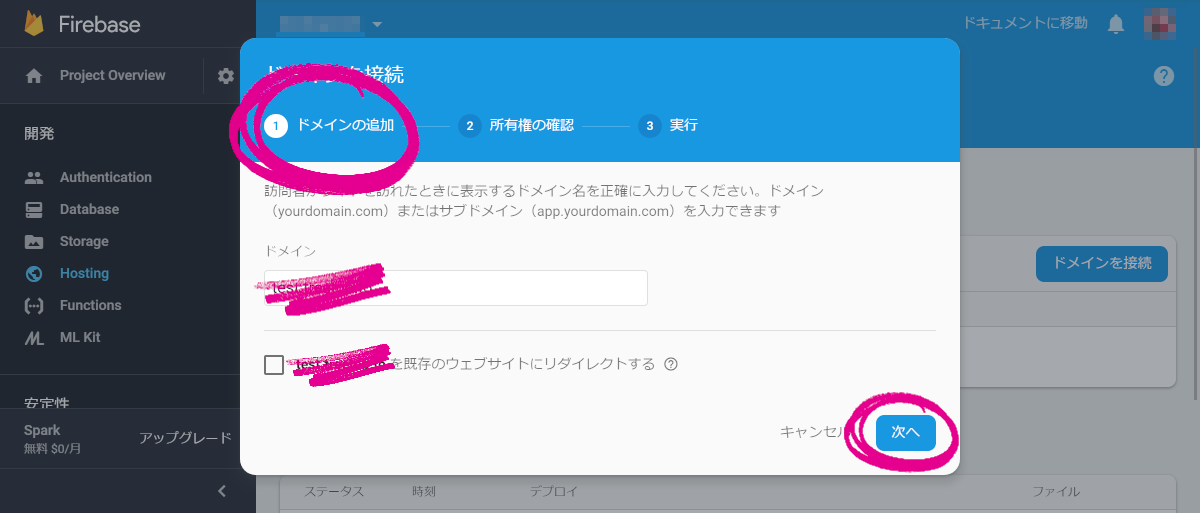
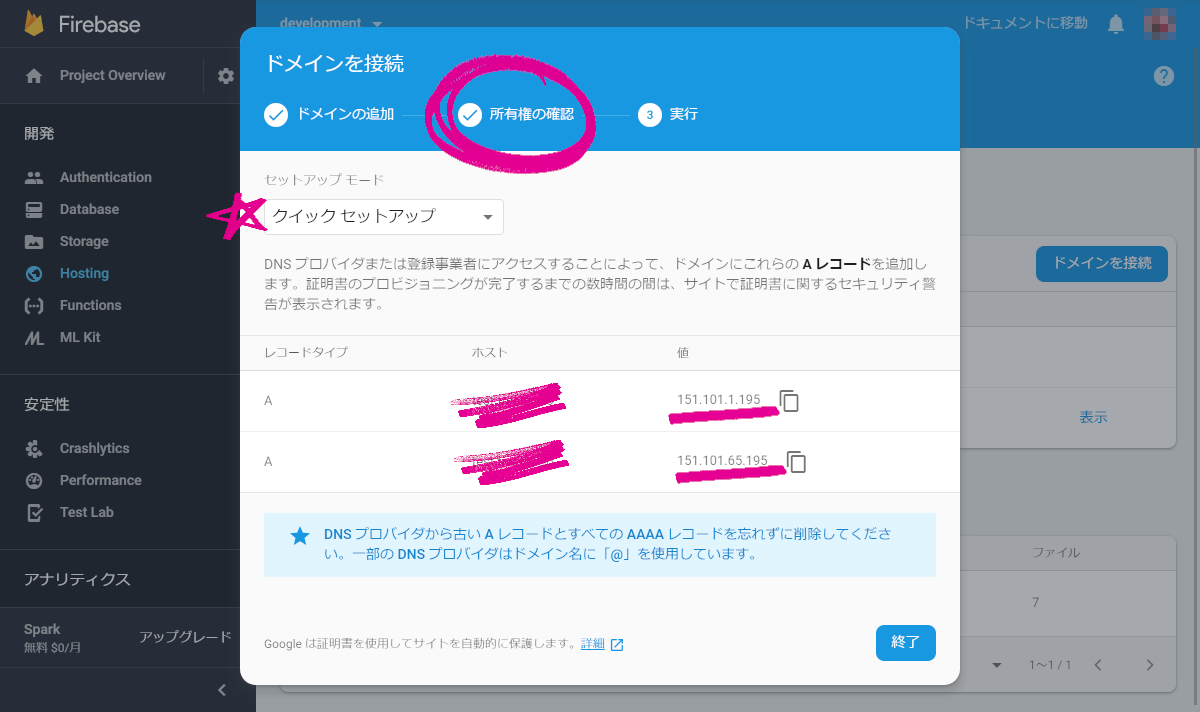
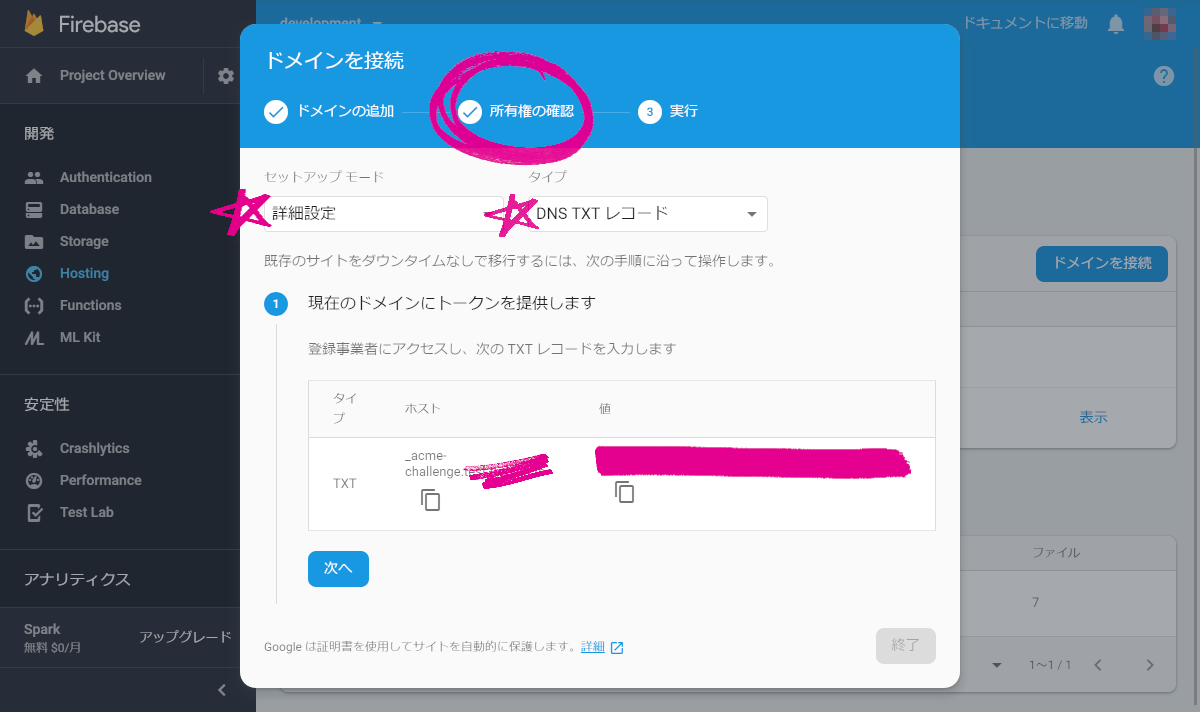
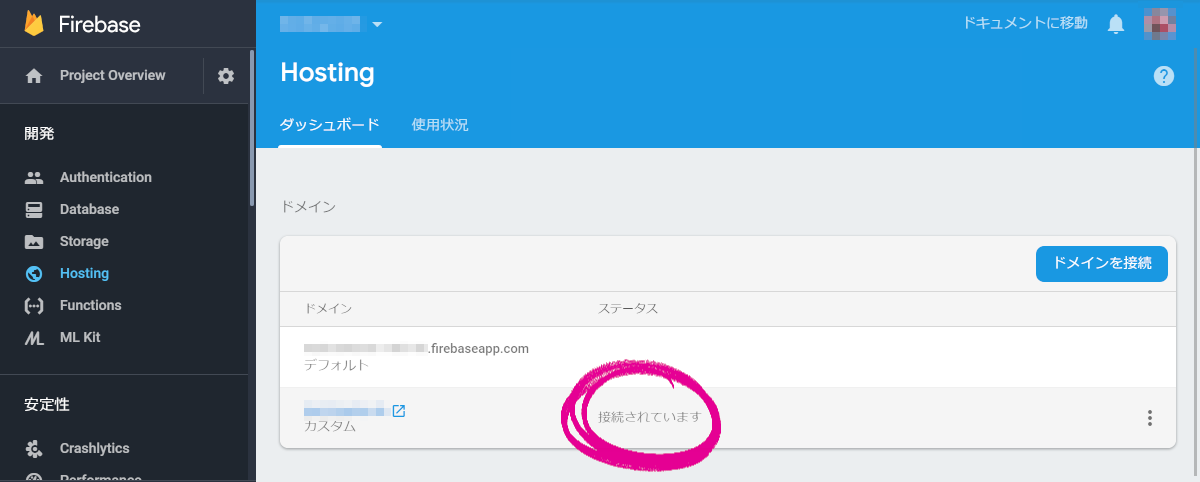
カスタムドメイン設定
- プロジェクトを選んで開発→Hosting→ドメインを接続
- ドメインの追加
- DNSに指定された値をAレコードに追加
- 既存のサイトから移行する場合は、詳細設定で提示されるTXTレコードを追加
- 設定待ち
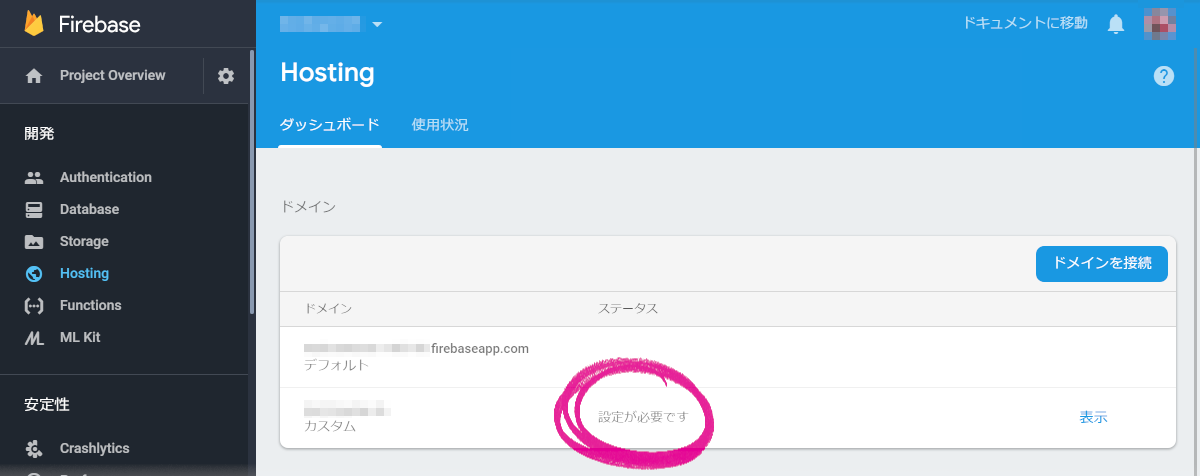
- DNS確認待ち?
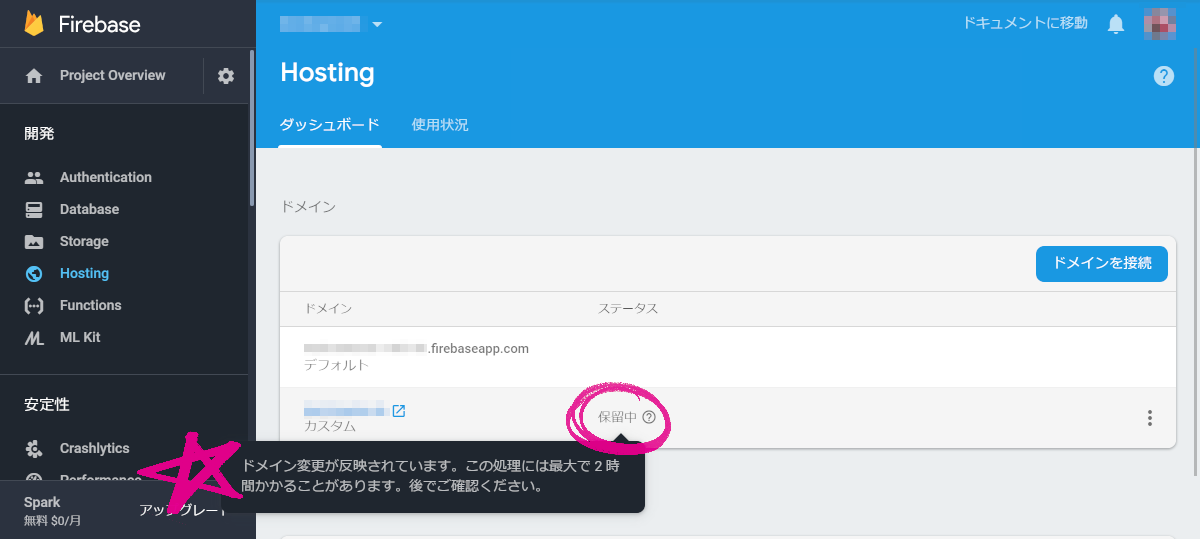
- 完了
作る
アプリを作成
左上にあるからプロジェクトの設定→全般にいろいろ情報が。
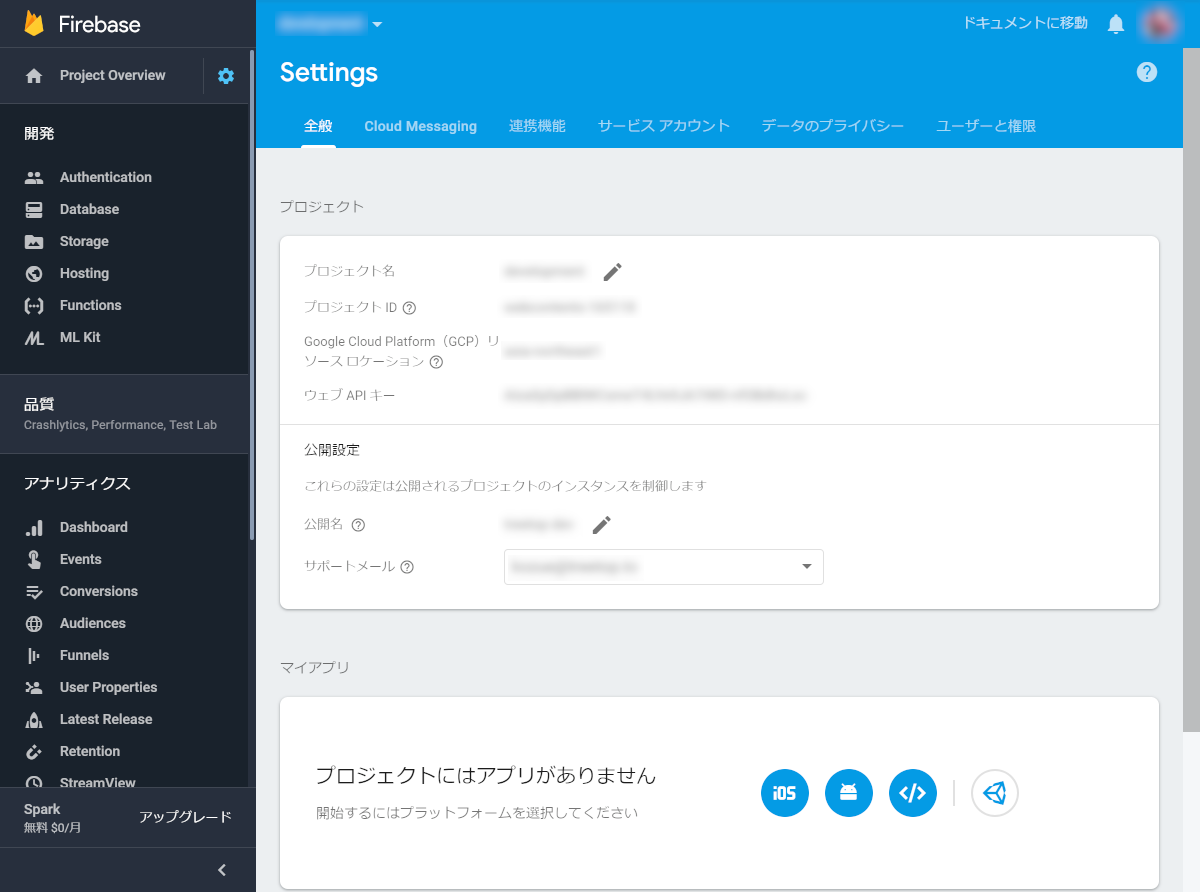
下にあるマイアプリからを選ぶとWebアプリ作成画面が。
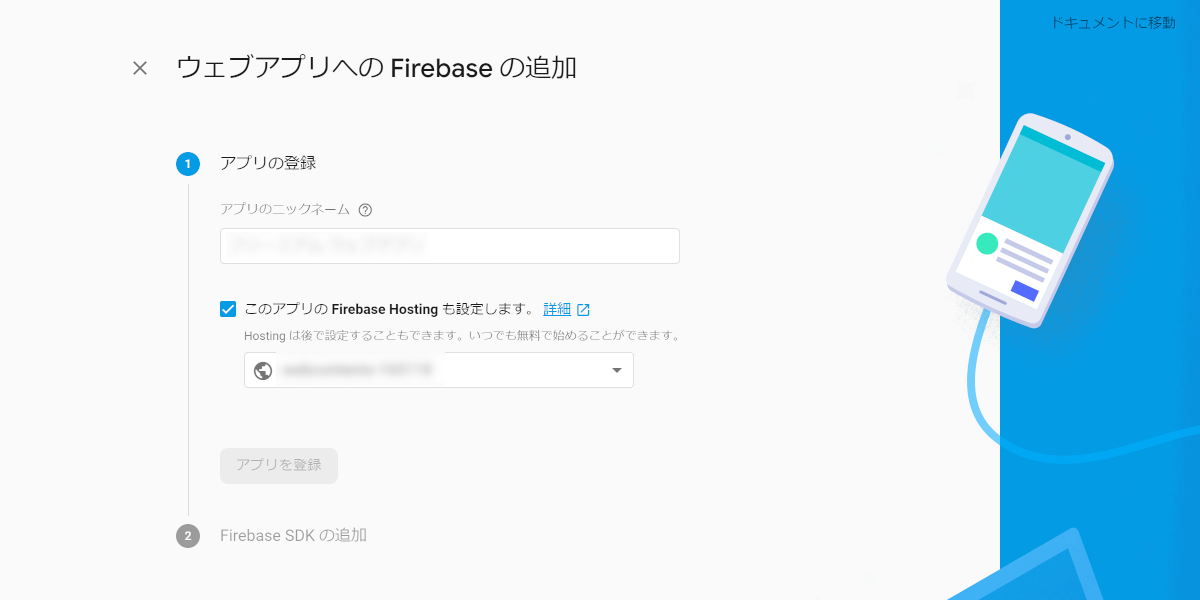
いろいろ入力してアプリを登録を押すと、作成に必要な情報が。
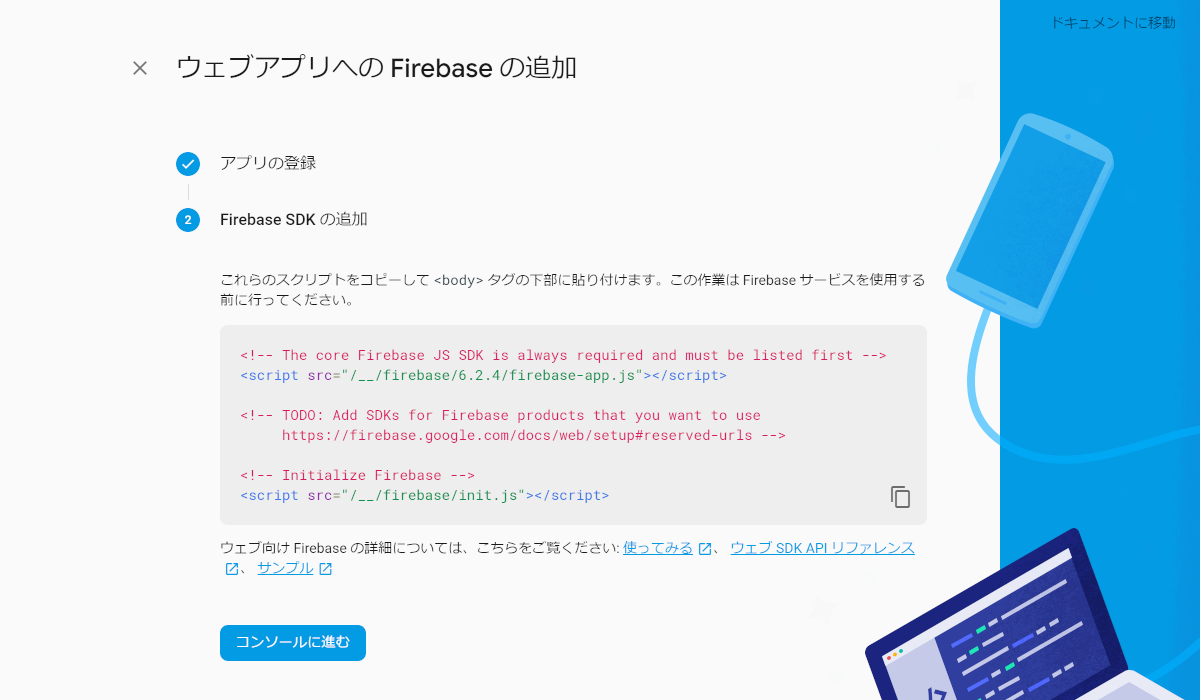
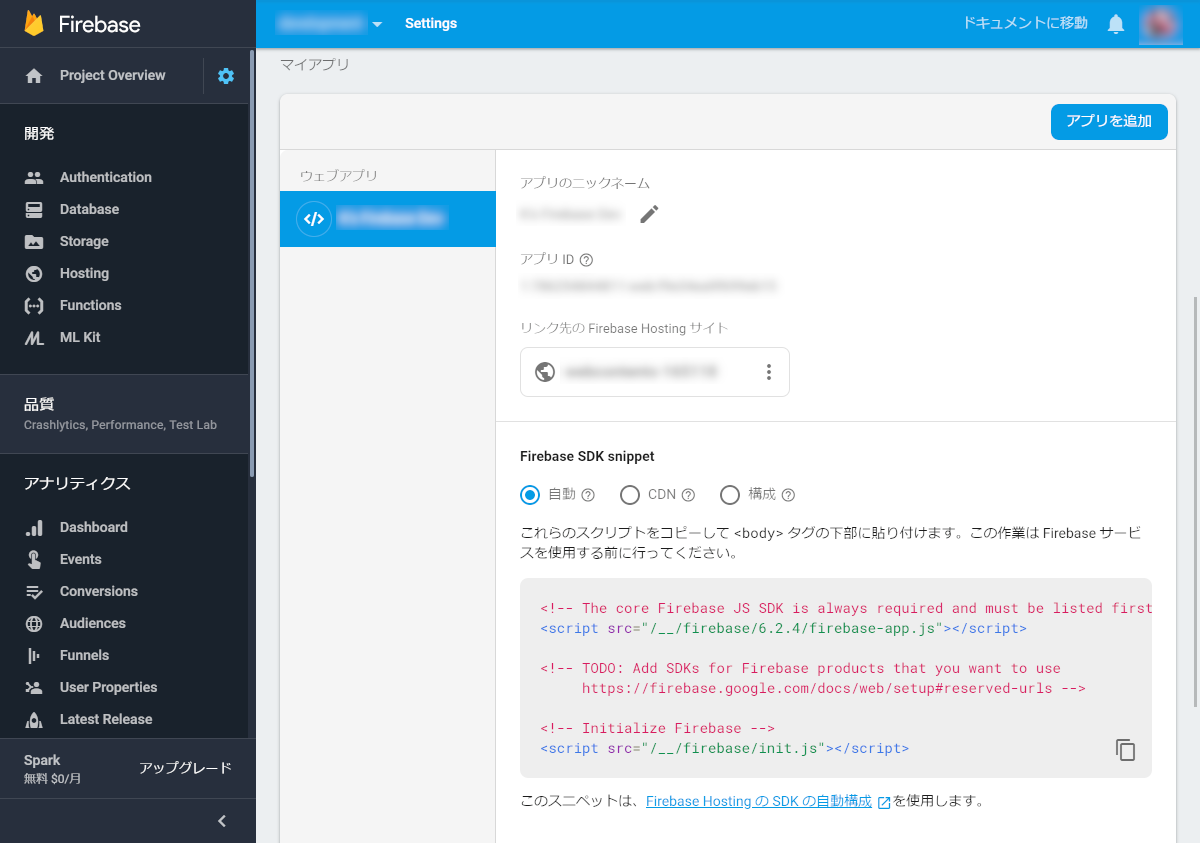
このコードはマイアプリから確認できるし、変更できるし、追加できるし。
これを貼り付ければ使えるように。
<!-- The core Firebase JS SDK is always required and must be listed first -->
<script src="/__/firebase/6.2.4/firebase-app.js"></script>

<!-- TODO: Add SDKs for Firebase products that you want to use
     https://firebase.google.com/docs/web/setup#reserved-urls -->

<!-- Initialize Firebase -->
<script src="/__/firebase/init.js"></script>
上記のやつだと認証もデータベース弄りもできないので、使うものだけ呼び出すと良いかなと。
<!-- update the version number as needed -->
<script defer src="/__/firebase/7.6.1/firebase-app.js"></script>
<!-- include only the Firebase features as you need -->
<script defer src="/__/firebase/7.6.1/firebase-auth.js"></script>
<script defer src="/__/firebase/7.6.1/firebase-database.js"></script>
<script defer src="/__/firebase/7.6.1/firebase-messaging.js"></script>
<script defer src="/__/firebase/7.6.1/firebase-storage.js"></script>

<!-- initialize the SDK after all desired features are loaded -->
<script defer src="/__/firebase/init.js"></script>
トッピングの情報はFirebase を JavaScript プロジェクトに追加するを参照に。
見たい
ローカルで確認
どのプロジェクトを有効にするか選択して、立ち上げ
$ firebase use
Now using alias <name> (<projectID>)
$ firebase serve

=== Serving from 'ディレクトリ名'...

i  hosting: Serving hosting files from: プロジェクト名
+  hosting: Local server: http://localhost:5000
こういう風になってた

外から見えるように
deployしてみる
$ firebase deploy

=== Deploying to 'プロジェクトID'...

i  deploying hosting
i  hosting[プロジェクトID]: beginning deploy...
i  hosting[プロジェクトID]: found 1 files in プロジェクト名
i  hosting: uploading new files [0/1] (0%)
i  hosting: uploading new files [0/1] (0%)
+  hosting[プロジェクトID]: file upload complete
i  hosting[プロジェクトID]: finalizing version...
+  hosting[プロジェクトID]: version finalized
i  hosting[プロジェクトID]: releasing new version...
+  hosting[プロジェクトID]: release complete

+  Deploy complete!

Project Console: https://console.firebase.google.com/project/プロジェクトID/overview
Hosting URL: https://プロジェクトID.firebaseapp.com
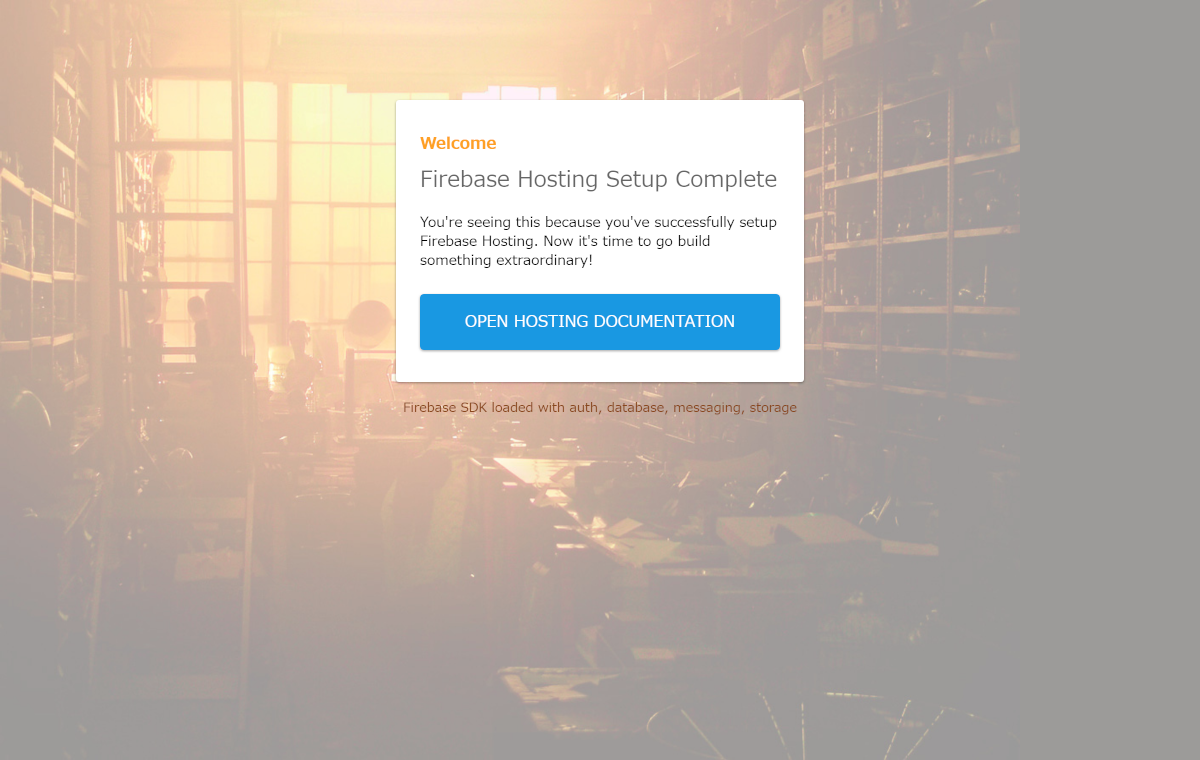
とりあえず器だけはできた…
さっそく無駄に背景やらファビコンやらを仕掛け済み。
立ち上げるとエラーが出る
ローカルで確認しようとしたら、こんなエラーが。
$ firebase serve

Error: HTTP Error: 401, Request had invalid authentication credentials. Expected OAuth 2 access token, login cookie or other valid authentication credential. See https://developers.google.com/identity/sign-in/web/devconsole-project.
認証してみた。
$ firebase login:ci --no-localhost

Error: Cannot run login:ci in non-interactive mode.
non-interactiveがダメなら、オプションを追加してみた。
$ firebase login:ci --no-localhost --interactive

Visit this URL on any device to log in:
(やたらと長いURLが出てくる)
Googleさんから認証が出るので、貼り付けた。
? Paste authorization code here: (出てきた文字列を貼り付け)
認証ができたはずなのに、やっぱり立ち上げられない。
$ firebase serve

Error: HTTP Error: 401, Request had invalid authentication credentials. Expected OAuth 2 access token, login cookie or other valid authentication credential. See https://developers.google.com/identity/sign-in/web/devconsole-project.
いろいろ調べてコマンドを叩く。
ただ、またnon-interactiveと怒られたので、こちらにも--interactiveオプションを追加。
$ firebase login --reauth --interactive
? Allow Firebase to collect anonymous CLI usage and error reporting information?
 Yes
Visit this URL on any device to log in:
(略)

Waiting for authentication...

+  Success! Logged in as メールアドレス
そしたら、できるようになったみたい。
$ firebase serve

=== Serving from 'ファイルのパス'...

i  hosting: Serving hosting files from: アプリ名
+  hosting: Local server: http://localhost:5000
参考
認証
さて、ここからが本題。
ブロジェクトのAuthenticasin→ログイン方法に、ログイン方法一覧が。
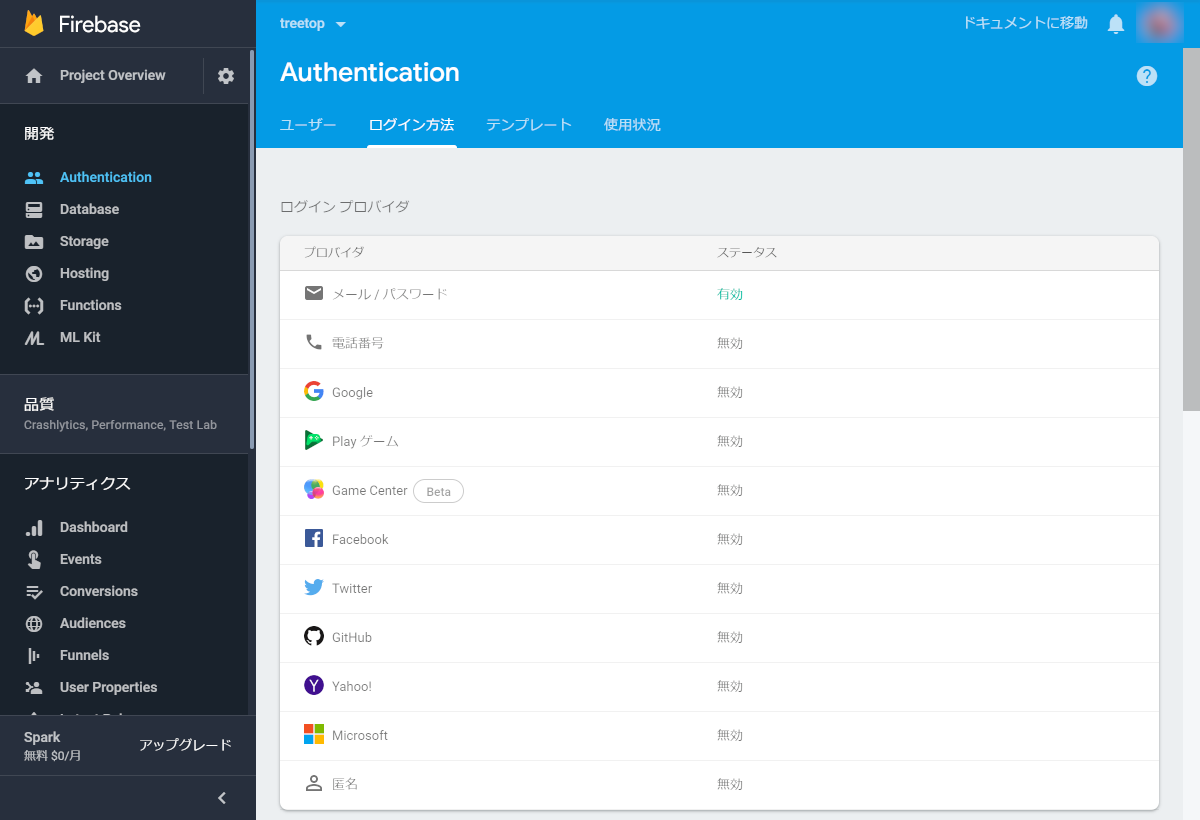
メール・パスワード認証
JavaScript でパスワード ベースのアカウントを使用して Firebase 認証を行う
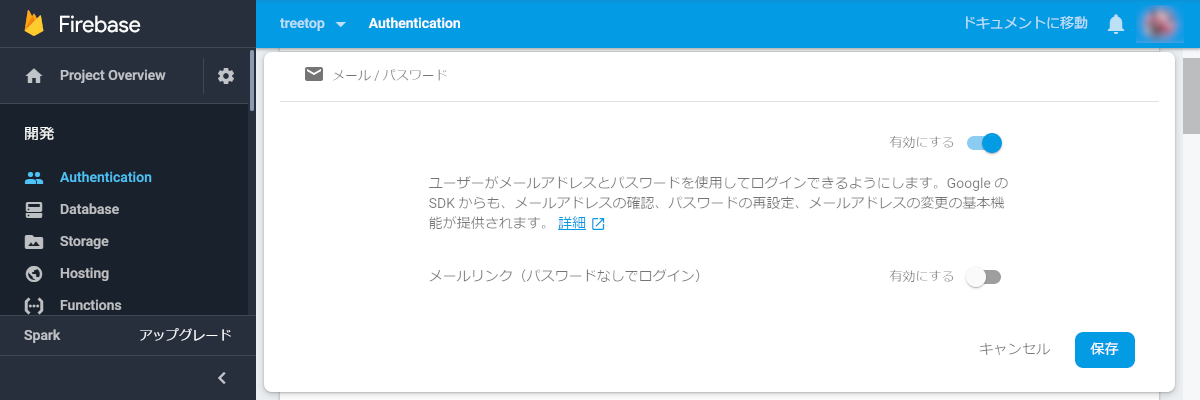
メール / パスワードを設定。
今回の目的はメール確認までさせたいので、メールリンクは無効に。
Google認証
ログイン方法としてGoogleを追加
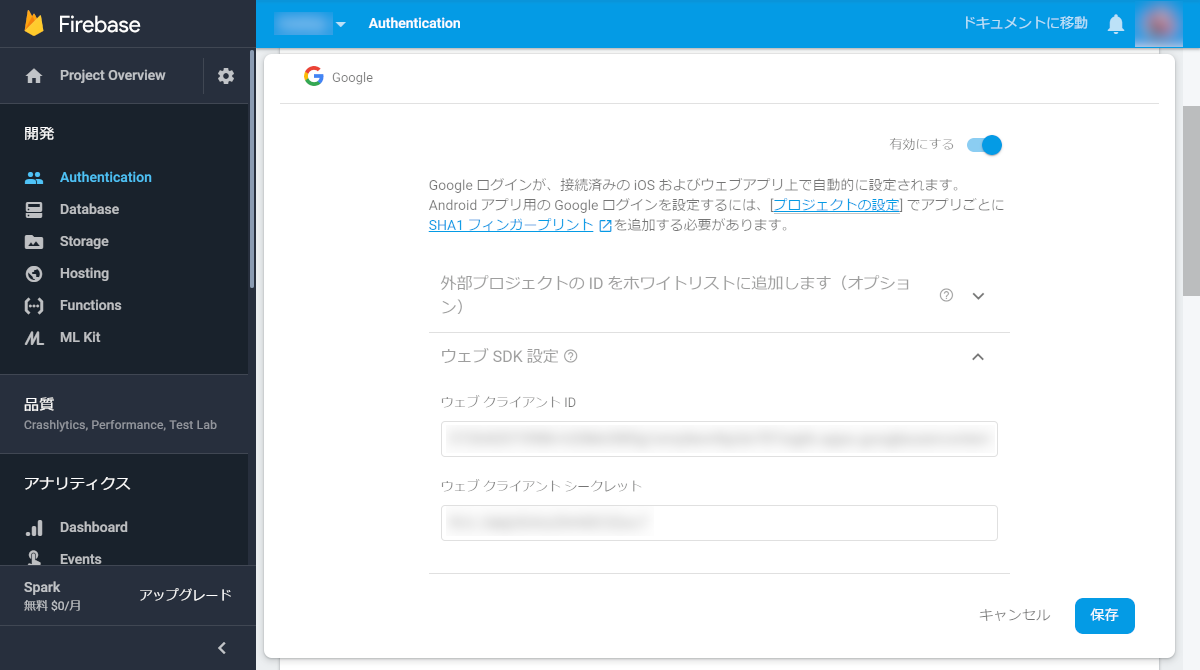
ウェブSDK設定の横にある疑問符から設定画面に飛べる
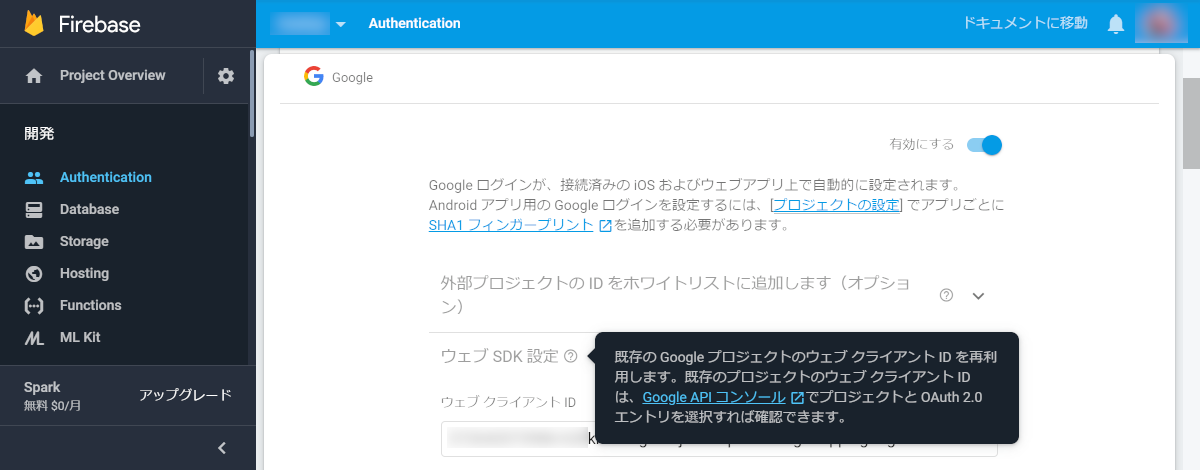
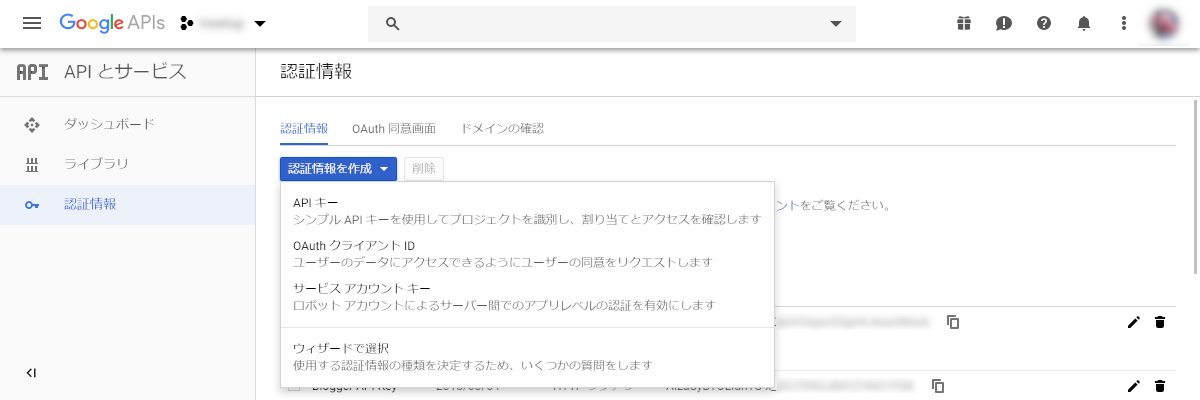
認証情報→認証情報を作成→OAuthクライアントID→OAuthクライアントIDの作成→ウェブアプリケーションでOAuthクライアントのIDとシークレットキーを作成
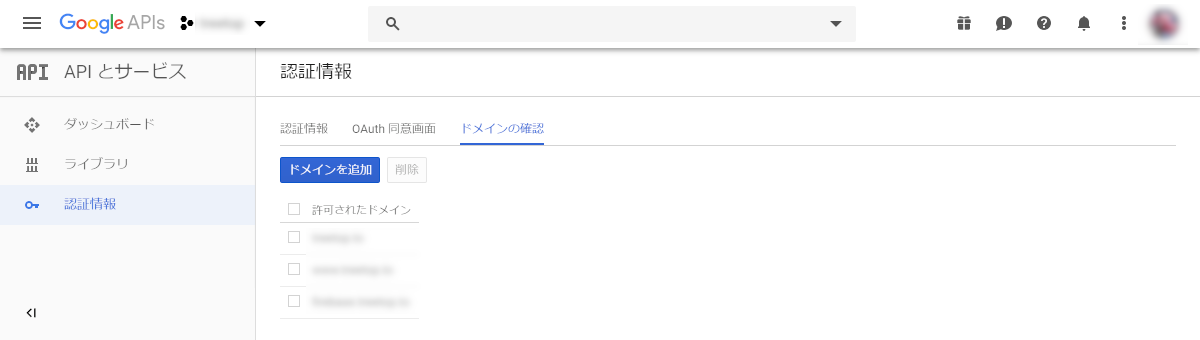
認証情報→ドメインの確認でドメインを追加
認証情報→OAuth同意画面→承認済みドメインに必要なやつを追加
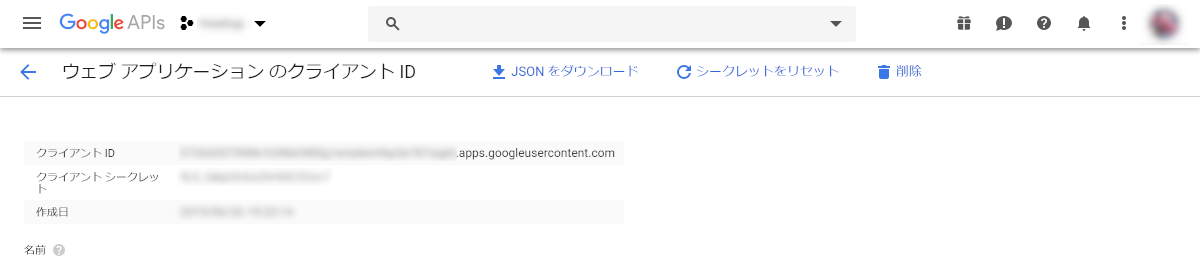
保存すると認証情報のOAuth 2.0 クライアント IDに追加されてる
追加したやつの名前を選ぶと、ウェブアプリケーションのクライアントIDが確認できるので、Firebaseのログイン方法に追加
下の方にある承認済みのJavascript生成元や承認済みのリダイレクトURIにドメインを追加
アプリを実際に使ってみると、Unverified appsと怒られた。 Unverified apps アカウントにアクセスできるサードパーティのサイトやアプリ 個人的に使いたいだけなので、プロジェクトをGsuiteのドメインの組織として登録したら使えるように1。 組織へのプロジェクトの移行
Facebook認証
facebook for developersにてアプリを作成
JavaScript で Facebook ログインを使用して認証する
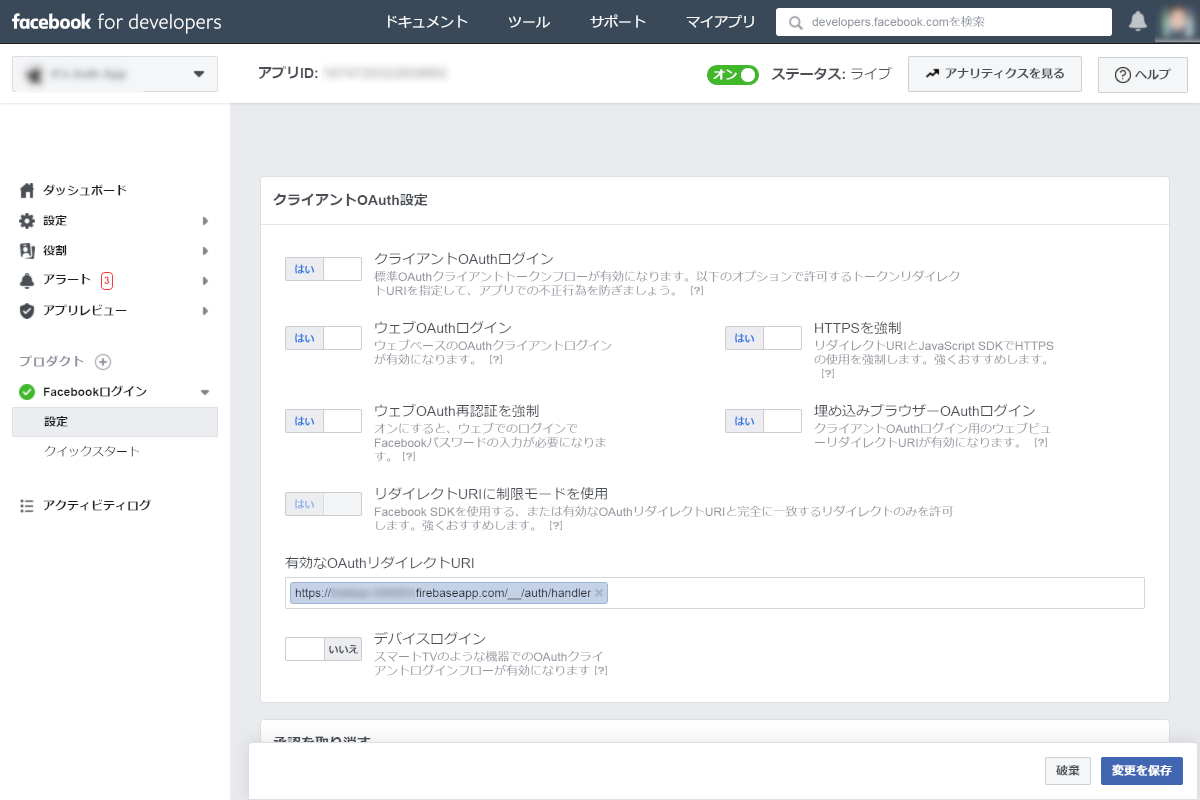
アプリのプロダクト→Facebookログイン→設定→クライアントOAuth設定→有効なOAuthリダイレクトURIを取得し、Firebaseに貼り付ける

Firebase側から取得したhttps://プロジェクト名.firebaseapp.com/__/auth/handlerなOAuthリダイレクトURIを貼り付ける
だいぶ前にアプリを作っていて放置してたけど、その間に権限が一部削除されてたり(ただし承認やOGPに関係ないやつ)、個人認証ってことで証明証を送らないと作業が進められなかったり…
Twitter認証
まずはログイン方法一覧から設定を。
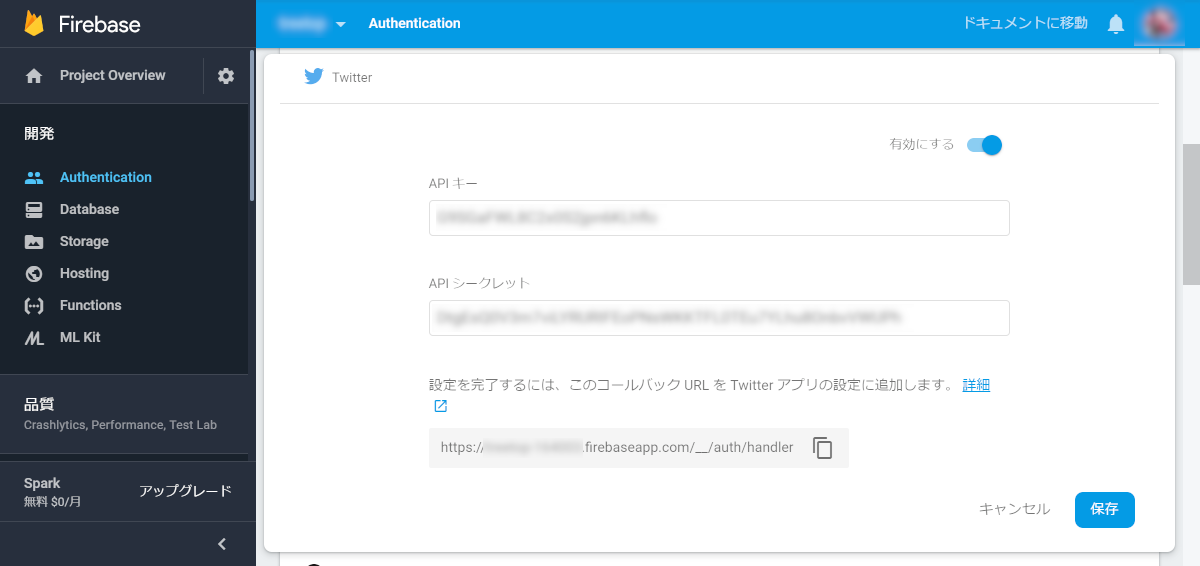
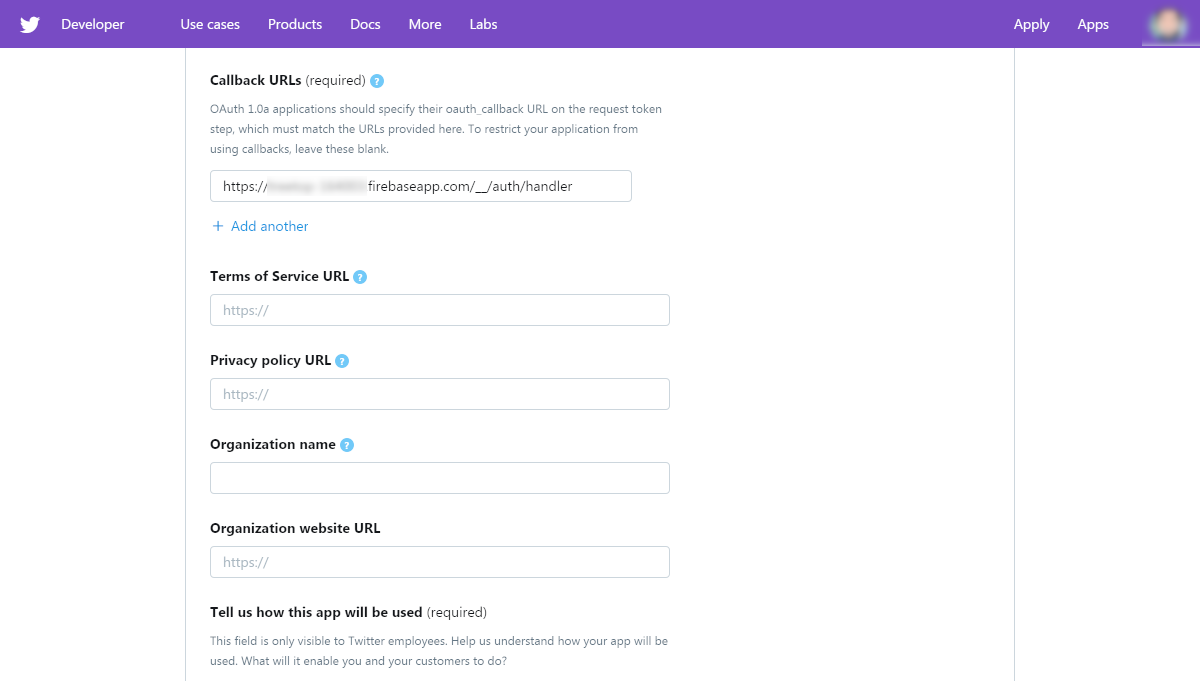
Twitter Developerからアプリ作成 (すでに作ってあって、複数作るには開発者アカウントを申請しないといけないみたいので割愛)
App detailsのCallbackURLsに、Firebaseから取得したhttps://プロジェクト名.firebaseapp.com/__/auth/handlerを追加
Tell us how this app will be usedも必須だけど、短すぎるとエラーになるのでどうやって埋めようかと…
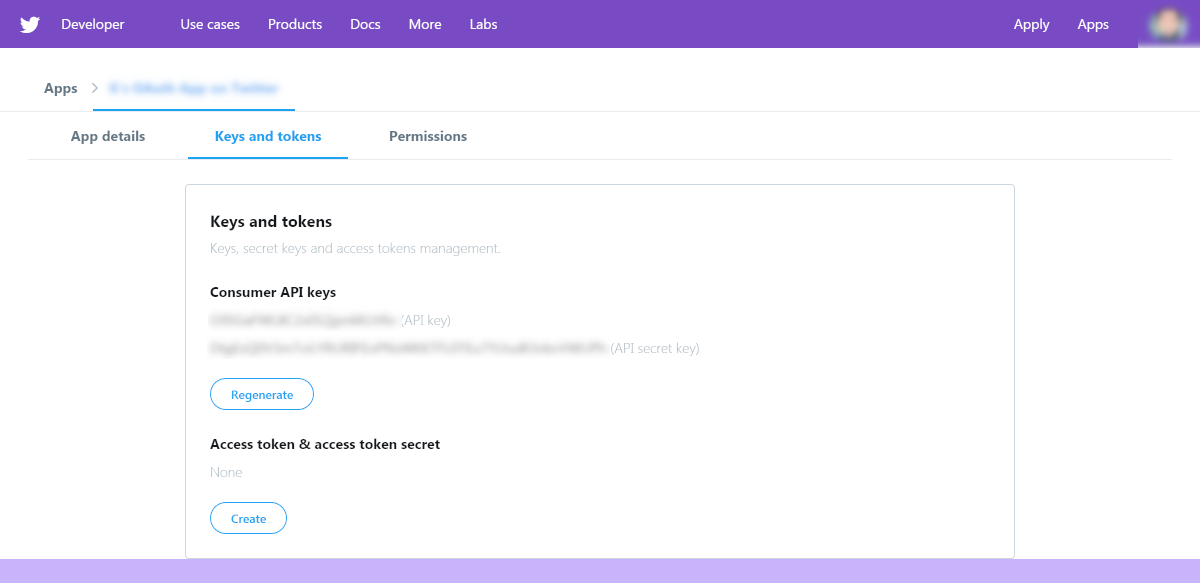
Keys and tokensから取得したキーをFirebase側に貼り付ける
GitHub認証
ログイン方法一覧からGitHubを選んで有効にすると、こういう画面に。

JavaScript による GitHub を使用した認証 FirebaseUI でウェブアプリに簡単にログイン機能を追加する Firebase | Authenticationで複数の認証プロバイダへ同時対応する (Web編)
Setting→Developer setting→OAuth Appsへ。 平たく言えば下記リンクを。 OAuth Apps(要・GitHubログイン)から登録
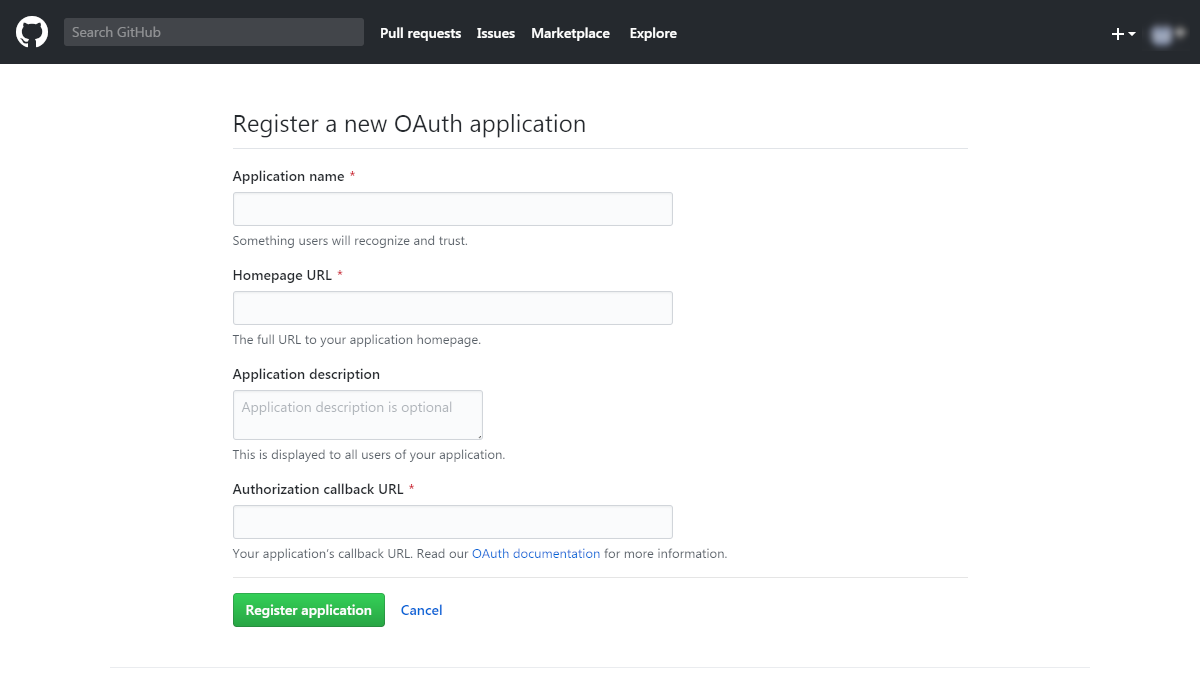
Authorization callback URLに、Firebaseから取得したhttps://プロジェクト名.firebaseapp.com/__/auth/handlerを追加。
あとはアプリ名やサイトURLとか。
作成したアプリを開くとClient IDとClient Secretが表示されているので、それをFirebase側に登録。
認証画面を作ってみる
元ネタはFirebase Auth Quickstarts。 サインインしたあとは別ページに飛ばしたいので、そのあたりを変えてみた。
まずはサインインのページを。
認証しか使わないなら、呼び出すのはfirebase-app.jsとfirebase-auth.jsとinit.jsだけでいい。
画面を整えるためにMaterializeやMaterial Design Liteも使ってみた。
そしてスクリプト。 サインイン・サインアップ周りは元ネタから取ってきたコードほぼそのまま。
サインイン後のページ。
そしてスクリプト。
ログイン画面の初期状態はSNS認証用の画面。
各種SNSの設定をしてあれば使える。

GitHub認証をするとこんな感じに。
Algoliaの検索フォームを出してる。
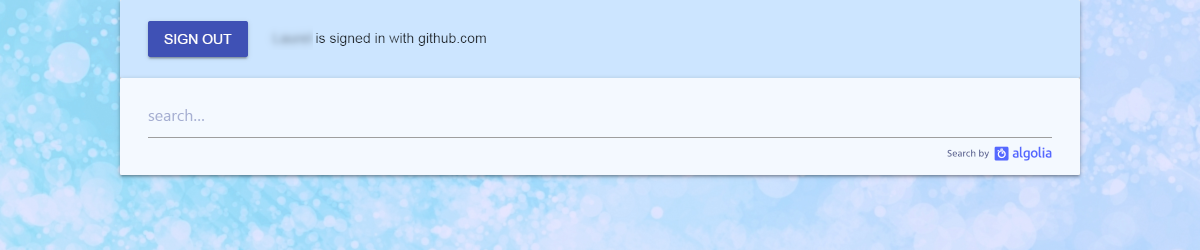
Email/Passwordボタンでメール認証モードに。
登録もパスワード再設定もできる。
SNS Buttonsで、さっきのSNS認証モードに戻れる。

サインインでパスワードリセットボタンとAlgoliaの検索画面を。

ポイントとしては、
- サインインページから認証後
location.hrefで飛ばす - 飛び先のページで
onAuthStateChangedを使って情報を受け取る - サインインせずに飛び先のページを直接開いても
location.replaceで追い出す
というところかな。
メールテンプレート
そのままだとfirebase丸出しのメールアドレスになるので、メールテンプレートのカスタムドメインを。
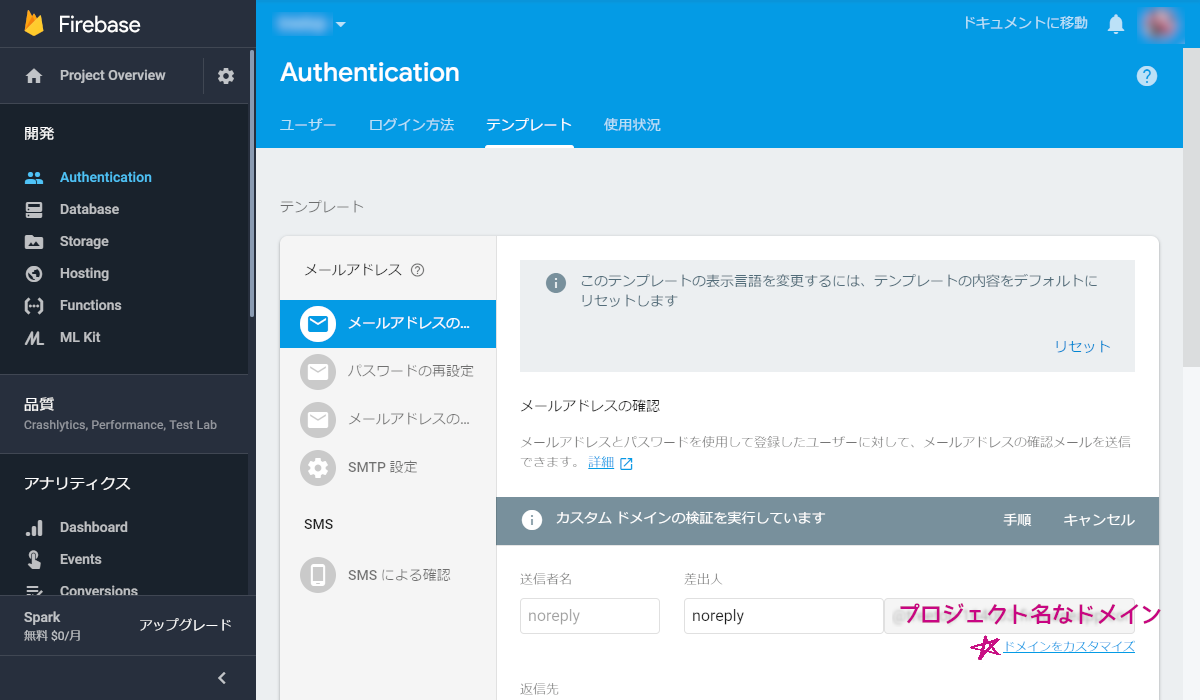
| ホスト | タイプ | 値 |
|---|---|---|
| ドメイン | TXT | v=spf1 include:_spf.firebasemail.com ~all |
| ドメイン | TXT | firebase=プロジェクト名 |
| firebase1._domainkey.ドメイン | CNAME | mail-ドメイン.dkim1._domainkey.firebasemail.com. |
| firebase2._domainkey.ドメイン | CNAME | mail-ドメイン.dkim2._domainkey.firebasemail.com. |
ドメインの所有権を確認するまで、最大48時間かかるんだそうな。
-
Google Apps for Your Domain万歳。 ↩